Thanks for visiting our wiki! Click here to order your own game server at SurvivalServers.com
Difference between revisions of "How to Set a Custom Domain to Connect to a Valheim Server"
Jump to navigation
Jump to search
Share your opinion
| Line 20: | Line 20: | ||
#:*Type - A | #:*Type - A | ||
#:*Name - mydomain.com | #:*Name - mydomain.com | ||
| − | To get your IPv4 Address, you will want to go to your Survival Servers game server panel and copy the IP as seen here: | + | #:*To get your IPv4 Address, you will want to go to your Survival Servers game server panel and copy the IP as seen here: |
| − | + | #:*[[File:Finding IP at Survival Servers Control Panel.png|390px]] | |
| − | [[File:Finding IP at Survival Servers Control Panel.png|390px]] | ||
#:*IPv4 address: 216.250.254.30 (in this case, your case will be different so ''change this accordingly'') | #:*IPv4 address: 216.250.254.30 (in this case, your case will be different so ''change this accordingly'') | ||
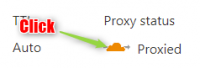
#:*Uncheck the Proxy status | #:*Uncheck the Proxy status | ||
| − | + | #:*[[File:Uncheck Cloudflare Proxy Status.png|200px]] | |
| − | [[File:Uncheck Cloudflare Proxy Status.png|200px]] | ||
| − | |||
# Click Save, you've now added the subdomain record pointing to your game server's IP address. | # Click Save, you've now added the subdomain record pointing to your game server's IP address. | ||
# Click Add record again, now we will add the Port configuration | # Click Add record again, now we will add the Port configuration | ||
# Set the following | # Set the following | ||
| − | + | #:*Type: SRV | |
| − | * Type: SRV | + | #:*Name: play (for example we will use play.mydomain.com so we enter '''play''' here) |
| − | + | #:*Service: _valheim | |
| − | * Name: play (for example we will use play.mydomain.com so we enter '''play''' here) | + | #:*Protocol: TCP |
| − | + | #:*TTL: Auto | |
| − | * Service: _valheim | + | #:*Priority: 0 |
| − | + | #:*Weight: 0 | |
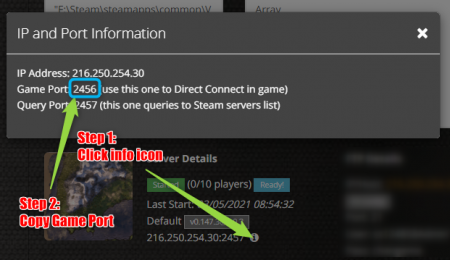
| − | * Protocol: TCP | + | #:*Port: 2456 (copy Game Port from your game server panel, see image below to get Game Port) |
| − | + | #:*[[File:Copy Game Port from Game Server Panel.png|450px]] | |
| − | * TTL: Auto | + | #:*Target: play.mydomain.com (change '''play''' to your subdomain name, change '''mydomain.com''' to your domain name) |
| − | |||
| − | * Priority: 0 | ||
| − | |||
| − | * Weight: 0 | ||
| − | |||
| − | * Port: 2456 (copy Game Port from your game server panel, see image below to get Game Port) | ||
| − | |||
| − | [[File:Copy Game Port from Game Server Panel.png|450px]] | ||
| − | |||
| − | * Target: play.mydomain.com (change '''play''' to your subdomain name, change '''mydomain.com''' to your domain name) | ||
| − | |||
# Click Save, you have now set a subdomain to your Valheim server! | # Click Save, you have now set a subdomain to your Valheim server! | ||
Revision as of 10:35, 5 March 2021
If you want an easier method of joining your Valheim server without typing in that pesky ip:port each time (and remembering which port was which) you can set a custom domain or subdomain for your Valheim server to connect.
Similar to Minecraft, this method binds a port to a subdomain and allows your players to easily use the Direct Connect within the game to connect. Example:

The Method
This step assumes you own a domain name with Namecheap and will be utilizing Cloudflare for your DNS settings.
- Go to Cloudflare and sign up for an account, you will use your domain and fully set it up
- Go to the DNS link at the top of your Cloudflare domain page

Using a Subdomain (play.mydomain.com)
- Click the Add record button
- Set the following:
- Type - A
- Name - mydomain.com
- To get your IPv4 Address, you will want to go to your Survival Servers game server panel and copy the IP as seen here:
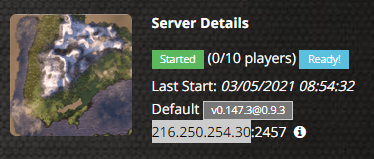
- IPv4 address: 216.250.254.30 (in this case, your case will be different so change this accordingly)
- Uncheck the Proxy status
- Click Save, you've now added the subdomain record pointing to your game server's IP address.
- Click Add record again, now we will add the Port configuration
- Set the following
- Type: SRV
- Name: play (for example we will use play.mydomain.com so we enter play here)
- Service: _valheim
- Protocol: TCP
- TTL: Auto
- Priority: 0
- Weight: 0
- Port: 2456 (copy Game Port from your game server panel, see image below to get Game Port)
- Target: play.mydomain.com (change play to your subdomain name, change mydomain.com to your domain name)
- Click Save, you have now set a subdomain to your Valheim server!


Joining a Valheim Server With a Custom Domain (or Subdomain)
Follow these steps to join your newly created domain (or subdomain) to your Valheim server.
- Start the game and click the Start Game button
- Select a character from the character selection screen and click Start
- Click on the Join Game tab at the top
- Click the Join IP button and type in your domain (or subdomain)

Share your opinion